This post comes from friend and cinematographer, Michael Cameneti. Michael is so talented when it comes to the world of video, with an impressive portfolio of commercials, and short films, so I thought, who better to explain lighting for video? This tutorial is aimed towards helping to set up lighting for a simple “interview” style video shoot. You can see some of Michael’s work by checking out http://vimeo.com/cameneti or look him up on twitter – https://twitter.com/mcameneti
Enjoy!
LIGHTING FOR AN INTERVIEW
-Michael Cameneti
I was honored when Aaron asked me to write a small article on lighting for video (I hate saying “video”… it sounds so “local-car-commercial” hah). My initial thought was, I honestly don’t feel like I know what I’m doing, who am I to write this article? Film is an always-evolving “business” where new styles, tricks and flavors change constantly. New gear surfaces every 5 minutes these days, so it can seem like a chore to keep up. I could go in so many different directions with tips for all kinds of shooting, but I thought I would keep it very basic and share what I’ve learned for lighting for an interview.Lighting is a powerful tool. It has the ability to enhance your shoot & create a specific mood, or it can make your shoot look like crap, if you’re not careful, & ruin a specific emotion that you are trying to portray. But, I want to simply talk about the basic three- point lighting technique that is typically used in an interview set up.Here is a simple diagram to show the basics of a three-point lighting set up: 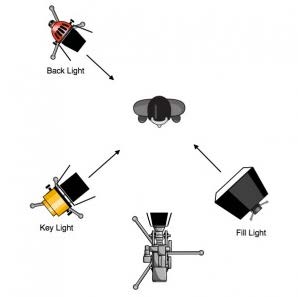
-Michael Cameneti
I was honored when Aaron asked me to write a small article on lighting for video (I hate saying “video”… it sounds so “local-car-commercial” hah). My initial thought was, I honestly don’t feel like I know what I’m doing, who am I to write this article? Film is an always-evolving “business” where new styles, tricks and flavors change constantly. New gear surfaces every 5 minutes these days, so it can seem like a chore to keep up. I could go in so many different directions with tips for all kinds of shooting, but I thought I would keep it very basic and share what I’ve learned for lighting for an interview.Lighting is a powerful tool. It has the ability to enhance your shoot & create a specific mood, or it can make your shoot look like crap, if you’re not careful, & ruin a specific emotion that you are trying to portray. But, I want to simply talk about the basic three- point lighting technique that is typically used in an interview set up.Here is a simple diagram to show the basics of a three-point lighting set up:
Ok, so you have a subject that you want to interview. My first train of thought will typically be “what is the story?” From there, you want to find the right environment to film in to tell that story (but that’s for an entirely different article). Right now, let’s dive into how to light the interview.
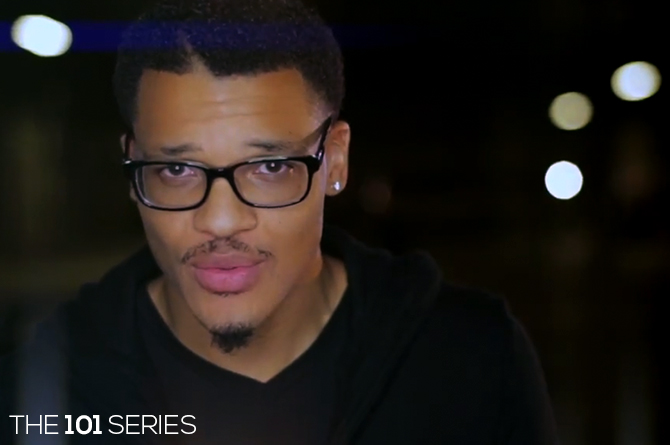
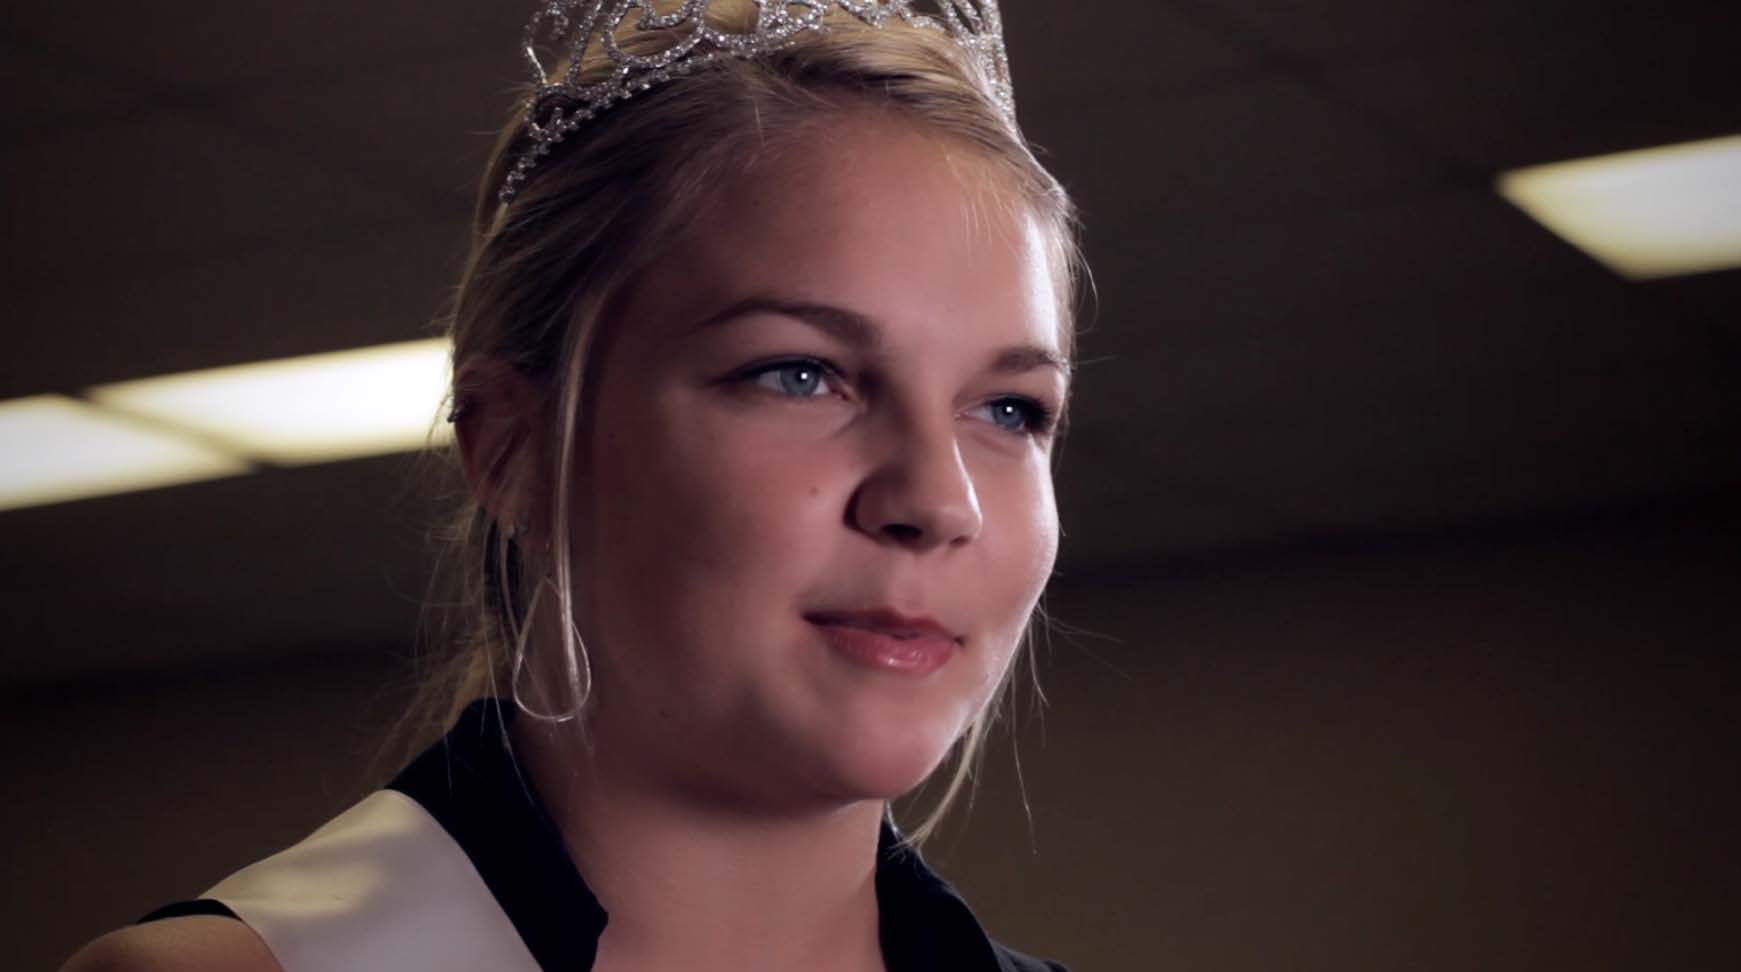
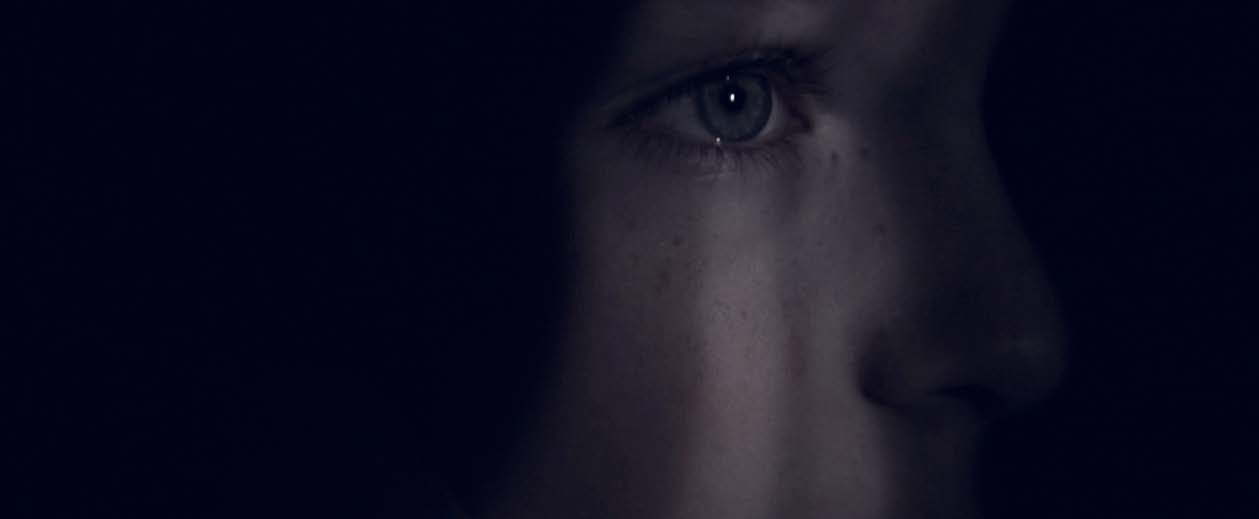
So you get your subject in a chair, stool or couch, your shot composition is beautiful, and you have your camera about 5 to 7 feet away from your subject (depending on your camera/lens). The first light you want to adjust is your key light. Key light is the light that will shine directly at your subject and be your “main light”. There are a few different ways to do this. You can use a soft box, LED with diffusion, or even a Par/Fresnel through some diffusion or reflected off some bounce. You definitely want to use diffusion so you aren’t capturing harsh shadows off of your subject’s nose or hair. Diffusion keeps the light nice and soft. Another tip that will really enhance your interview is making sure you capture that “sparkle” in your subject’s eye with this key light. What I mean by that is, make sure you can see the reflection of your key light in your subjects eye. Just like this screen grab of Kelsie:
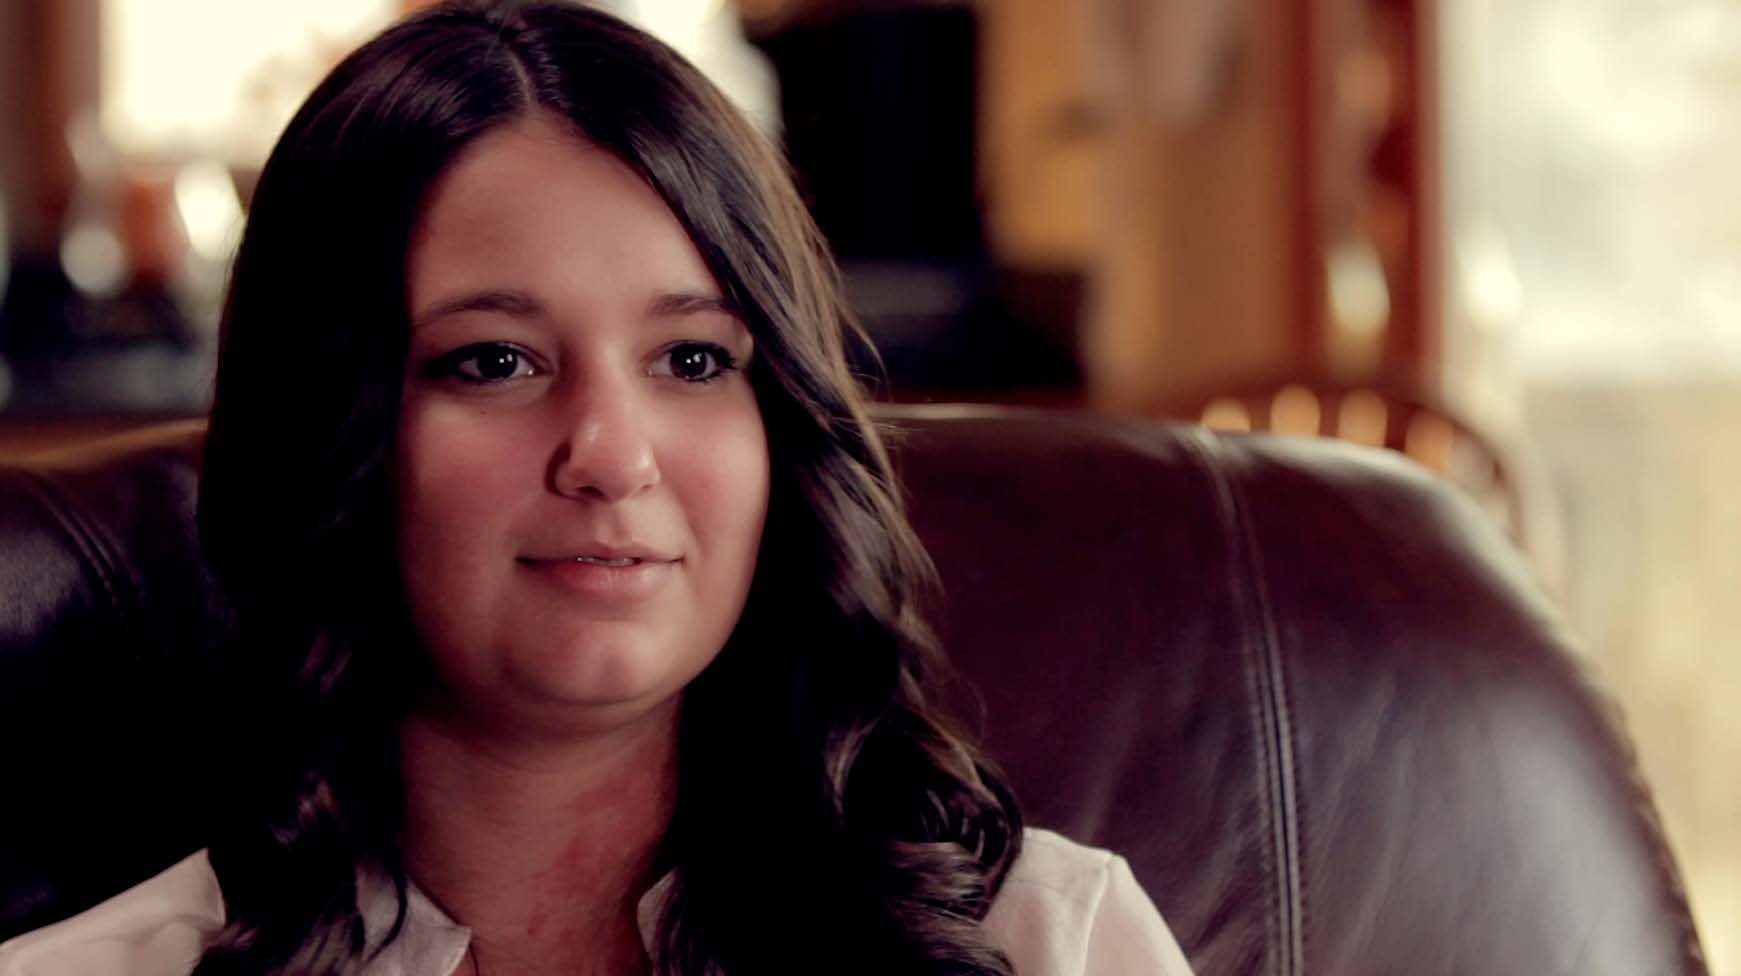

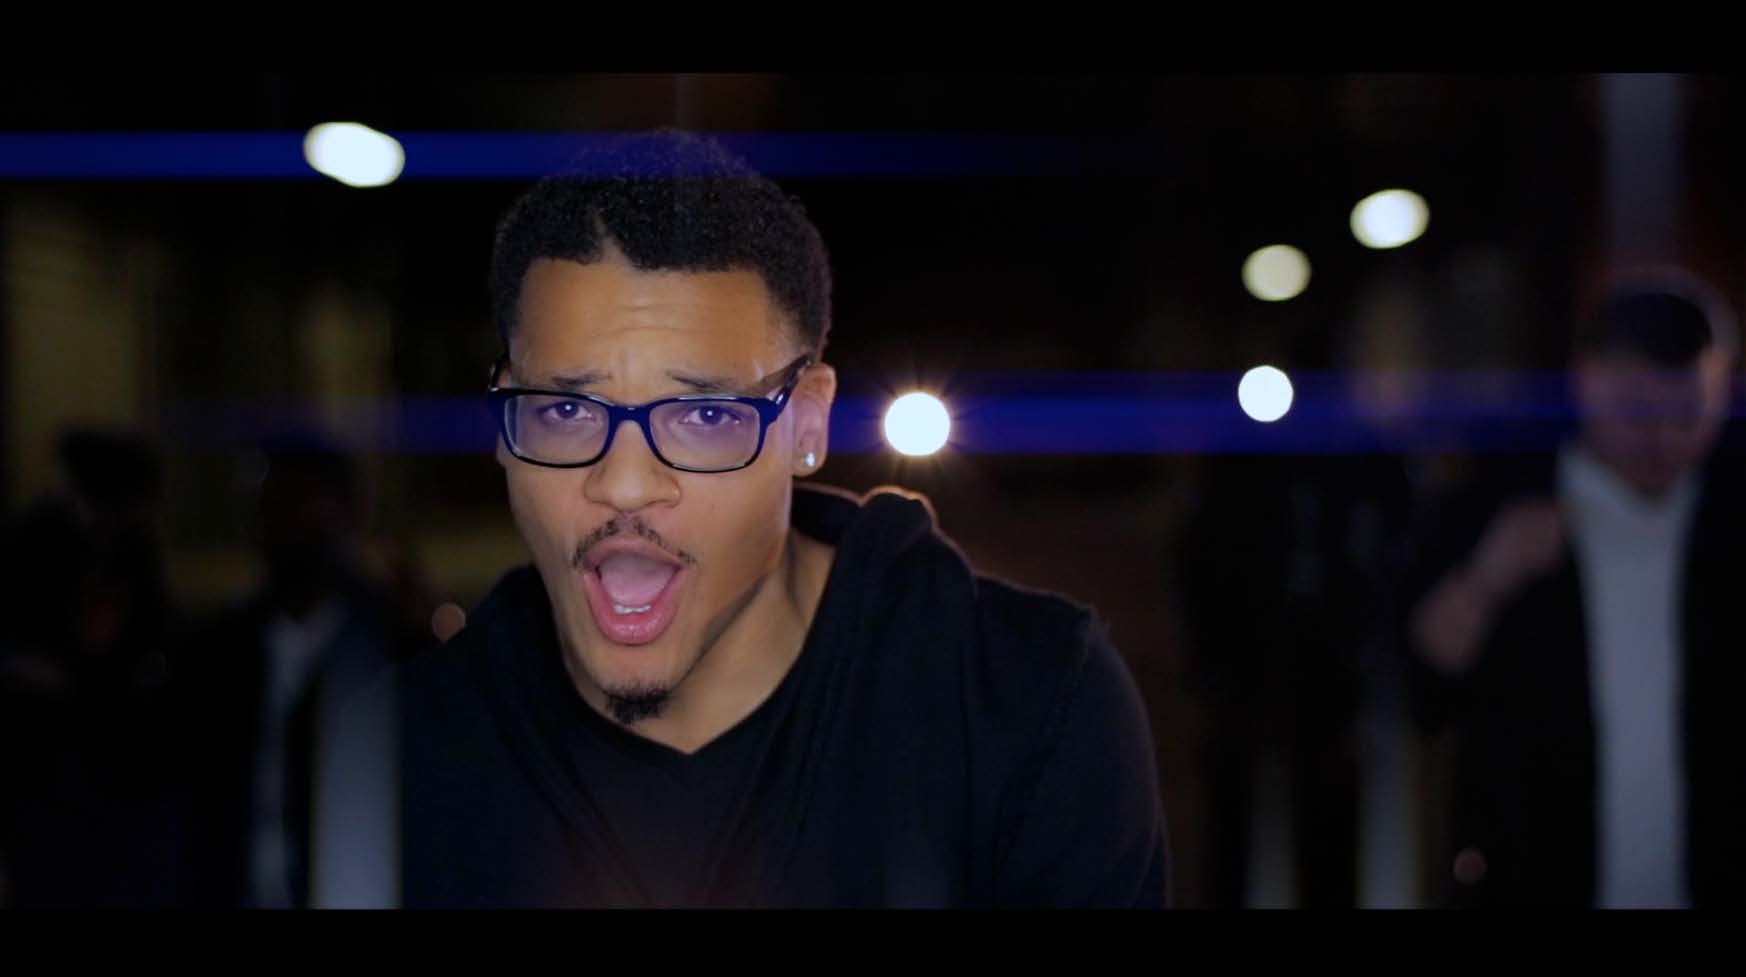
Notice that little white dot in her eye? That is from our key light. Now, the sparkle isn’t ALWAYS necessary. There are times where we want to shoot a more “cinematic” style of interview like this screen grab of Brett:
This shot has a key light that is more off to the side. It adds more of a contrast from one side of the face to the other that creates a much more cinematic/dramatic feel. And this is also due to the fact that there is no fill light.
Fill Light is the light that you will use to “fill in” the shadows from your key light. As the above screen grab of Brett shows, there is NO fill light. That was done on purpose to capture a specific mood for Brett’s story. Kelsie’s screen grab, on the other hand, has quite a bit of fill light to create a different mood altogether. I didn’t want to see a huge contrast on her face for this shot. Fill light can also be a very important element for your colorist in post. When you start messing with s-curves and black levels, the contrast becomes much greater. The information that the camera captures (depending on the cameras dynamic range) will start to change drastically and you may lose some definition in the face if you aren’t careful. A good DP will know how much light is needed for post, so there aren’t too many gross shadows! *Side note: shooting more neutral/flat will give you a greater dynamic range in post, rather than filming with a “preset look” or shooting with a standard profile (for DSLR filming). Fill light will sometimes require diffusion as well. Just keep in mind that we don’t want to see harsh light on our subject’s face that creates unwanted shadows.
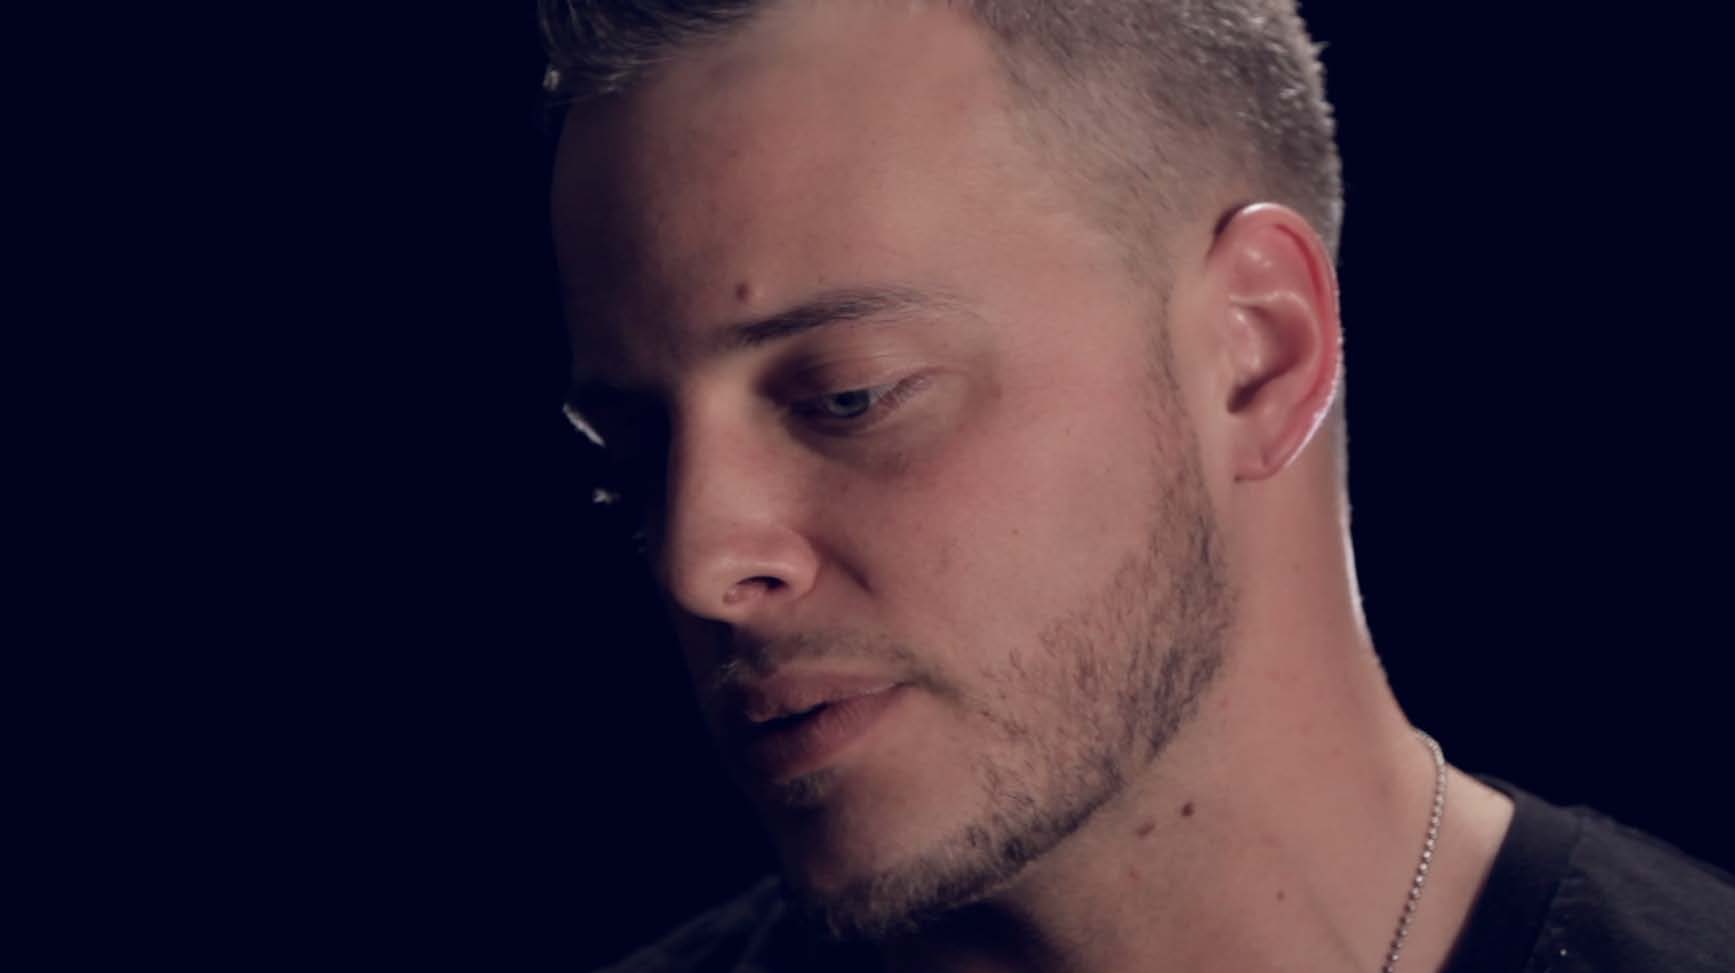
The last light we will talk about is our Back Light. This screen grab of Kevin shows a bit of back light:

Notice the light on Kevin’s left ear/neck/head. This is being generated by the light that is about 10 feet behind Kevin, just off to the left and up to about 7 feet in the air. It’s very subtle, but keeps Kevin from blending into the background. It makes him pop out more in the shot. There is also no diffusion on this light. A lot of this comes down to personal taste and what you are trying to accomplish on set, but I tend to like it more direct for back light or edge light.
Here is another example of some back light used to light a subjects hair:

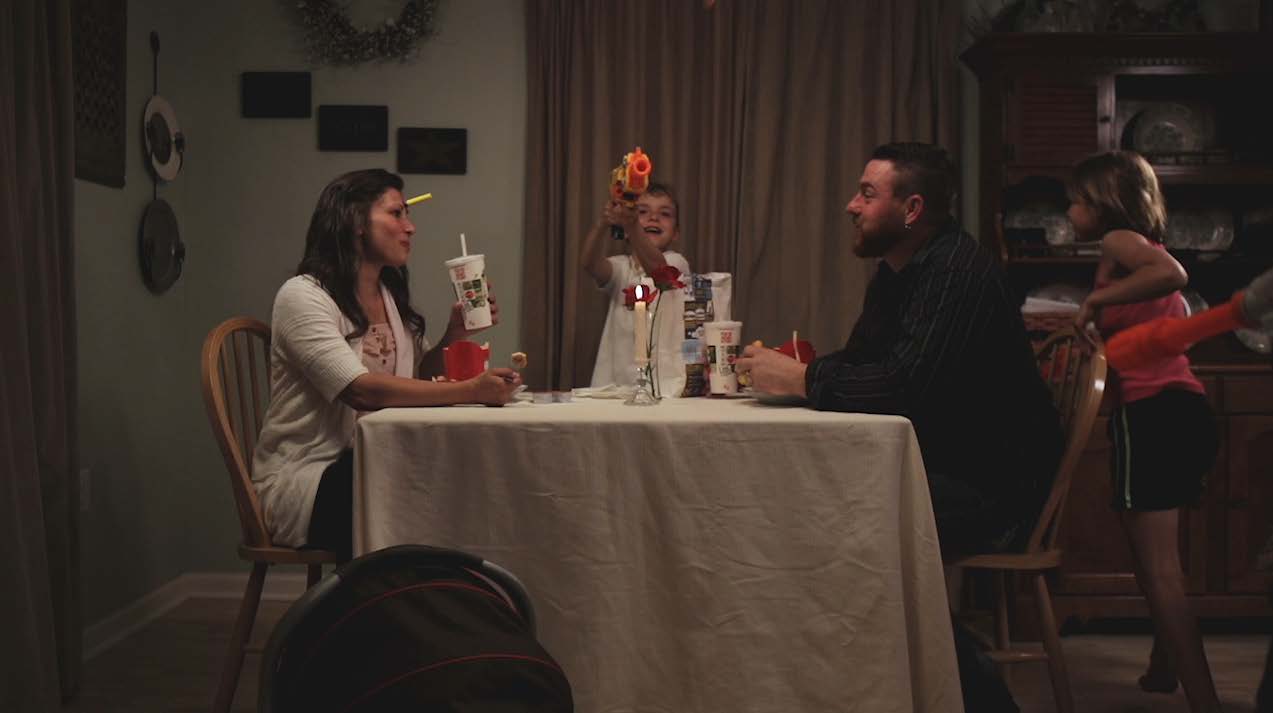
Notice the light on the top of Mary Kay’s head? This is being generated by the LED light that is positioned directly above her head and pointing downward from a C-stand. If I remember correctly, we had this light dimmed all the way down, so it was very subtle. One other thing I want to point out is the bokeh in the background (Bokeh is the way the lens renders out-of-focus points of light). These lights were intentionally placed in the back to create depth in the shot, and also establish that she is in the dining room (kitchen in background). We used Mary Kay’s track lighting and pointed it back towards the cabinets to fill up any shadows. We used an LED to hit the microwave. We used an LED to brighten up the area with the Keurig behind her right shoulder. And we placed the fake candle light for a nice spot of bokeh over her left shoulder. This is all in addition to the three-point lighting we set up to light Mary Kay at the dinner table. Just to make it more interesting and to help tell the story.
Sometimes it can be overwhelming to think, “I don’t have the money to create this type of lighting on set”. That’s actually not true. Yes, I have access to very nice LED panels, 1k’s, soft boxes etc., but you can achieve a nice lighting interview by using some home desk lamps, track lighting and even flashlights if necessary. I know it’s not ideal, but I’ve watched plenty of tutorials on Vimeo where people use very unique elements to light a set. Get creative! Start to trust your eye and don’t rush. Spend a day pre-lighting if you can afford it. And remember that if you fail, there is always something you can learn about the process to make yourself better the next time! I have so many “fail” experiences that I could write a whole article on them… but maybe next time.
Well, thanks for listening (if you made it this far), and I hope some of this was informative. This was really just scratching the surface on lighting for an interview. There are many different ways to approach lighting any sort of film, and my way isn’t always the right way. But there are basics in this three-point lighting set up that I think
will help anyone’s next interview shoot, and hopefully create the mood necessary for a great story!
-Michael
P.S. For good measure, here a few more instances of three-point lighting for you to observe:


The Author
Comments 2
Leave a Reply
You must be logged in to post a comment.
Really nice 101! Really nice information! Do you think that you could do a 101 on video lighting for a stage to do live broadcasting/streaming? We are looking into making that route and would really like to know how we need to add light to our stage!
Yeah, for sure, I can try to get one up in the next couple weeks!